Tuesday, April 26, 2016

Spring Spruce-Up for your Front Door


I always say a first impression lasts a lifetime, so you'd better make it a good one! I feel the same way with houses - the relation between a home's interior and exterior is one instance in which you can definitely judge a book by its cover!

I've been walking my dogs in our little neighborhood each morning and even occasional evenings in an effort to burn off some of their extra energy and enjoy the beautiful Spring weather.  As we explore the neighborhood, I play little game with myself called "what would I do if this was my house?" ... it certainly keeps me occupied! Most of the homes are completely charming and I wouldn't change a thing (ok maybe a paint color, but that's it).  Others are total makeover projects - does anyone else do this, or am I a truly crazy person?


These walks always inspire to work on the curb appeal of our little house. This past Sunday I installed a new door knocker from Waiting on Martha - one of my favorite online resources for cute decor - and it is definitely my new favorite thing about the exterior of our house, second only to the adorable mailbox we added when we moved in.  My least favorite? Our doorknob - note to self, order a new one! Below, are my favorite door knockers available online:


1)  Hexagon
2) Brass Lion Head
3) Brass Pineapple
4) Sly Fox
5) Classic round
6) Simple Midcentury

Fun fact: The pineapple has long been a symbol of hospitality - see this article for more history on the subject!

Xx
Ivy

Wednesday, April 20, 2016

Shagreen Obsession!


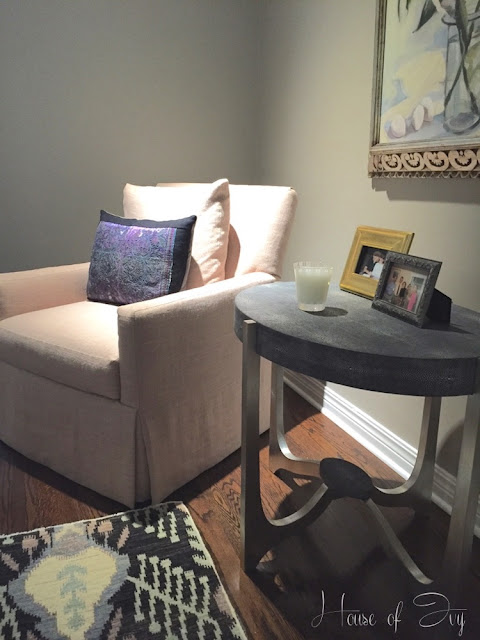
A recent install - fabulous faux shagreen table by Made Goods

If you are anything like me, you're obsessed with all things faux shagreen.  This is not exactly a groundbreaking new material, but I've seen an influx of demand for this mock-stingray finish recently in our shop.  Not only does it look incredibly luxe, but the faux variety is extremely durable, making it ideal for flat surfaces that get heavy use like coffee tables and dressers.  

A little history on the material: The Art Deco period is credited with popularizing the use of sting ray skin (shagreen) in furniture and objet d' art, but it's use actually dates back to ancient Egypt and the Chinese Han Dynasty.  In more recent history, Madame du Pompadour, Louis XIV's infamously opulent mistress had an insatiable appetite for little trinkets covered in shagreen and would order something from the French shagreen expert, Galluchat, almost weekly.  

While many contemporary furniture makers insist that they only harvest sustainable ray skins, their rarity drives the value up exponentially.  Faux ray skin, often made of resin or other plastics is much less expensive and can be made in unlimited quantities.  Plus, you get the feel-good factor of using something faux - knowing you didn't harm the same creature you swam with in the Bahamas to make your new side table!  

If you happen to speak French and would like a little light reading on the subject, check out this book about Monsieur Galluchat.  


Isn't this little vignette just dreamy?  I just delivered this gorgeous table this week to a long time client and friend, and it totally elevates the space - very luxurious.  Chair is Lee industries, Antique textile pillow is from 30A Home, and the stunning rug is by Amadi Carpets (available through 30A Home).  The table is by Made Goods, one of my favorite sources for a good faux shagreen.  I fell in love with this line a few years back at High Point Market, and have kept them in constant rotation for clients ever since. Below, are my five faux shagreen favorites to help you achieve this look at home!

1) This fabulous faux shagreen coffee table from OKL is to die for!  Give their shagreen selection a browse while you're at it!


2) A little goes a long way in the shagreen department - a tiny bit can add a lot of pizazz to your otherwise simple decor.  I love using it on teensy accent tables like this one.


3) My absolute favorite way to use shagreen these days is in a bright pop of color like these green nightstands.  I'm literally sitting here scheming up a way to get these into my house as I type!  I love how the vibrant punch of color takes an otherwise serious piece and makes it whimsical and fun. 


4) For the gal on a budget (ahem, yours truly)... West Elm has a beautiful selection of shagreen products right now, including these little trays. You can never have too many catch-alls, and they are the perfect way to bring in this trendy finish without breaking the bank!


5) And finally, if you're looking for a gorgeous shagreen mirror, look not further than my old favorite, Made Goods.  This mirror is one of my favorites, and I'm dying to use it on a job soon! 


Madame du Pompadour, eat your heart out! 

Xx
Ivy


Thursday, April 14, 2016

Midcentury Dresser Makeover


I've fallen off the blogging wagon this week... with good reason I promise. If you follow me on instagram, you might have seen that we've been a little preoccupied in our house with the addition of a new furry friend named Fritz!  I've spent the majority of my time dog-proofing our yard, making sure he is comfortable and acclimating to his new home and family.  I did manage to squeeze in a little project for myself however...

One of my goals this Spring is to update our guest bedroom and make it a little more functional for my main squeeze - he keeps his clothes in here, since our master bedroom closets are too small to share.  I should be a member of a Craigslist addicts support group or something, because I spend entirely too much time on there.  It takes time to find that one needle in the haystack of junk, and luckily about a month back I found an awesome midcentury dresser!


It has great lines, and to my surprise, it was in pretty good condition. The gentleman who posted the listing was kind enough to drop it off at our house along with two mirrors that came with it (don't worry, I have a plan for those as well).  I took inspiration from one of my favorite vintage furniture sources, Scout Design Studio  in Dallas. If you're ever looking for a good transformation, check out their website - and while you're at it, check out their new arrivals which usually go pretty fast!

Image via Scout Design Studio

Image via Scout Design Studio

I loved both of these creamy white lacquer jobs, and decided to give it a go with my own piece.  Mind, you I don't normally go about refinishing pieces for clients (I leave that up to the professionals), but for my own house I enjoy the creative process of transforming something shabby into a beautiful piece of furniture - I get an odd sense of pride and accomplishment out of doing these things myself!

THE PROCESS

STEP 1
Remove all hardware and wipe entire surface down with TSP - wipe it off immediately. Repeat. Since this piece was made of fiberboard and not hardwood, I opted not to sand it, but rather to just give it a good chemical clean. If you use this product, make sure to wear your rubber cleaning gloves and eye protection.  

Dilute with water according to the package instructions.  


STEP 2
Tape off what you don't want to paint. Nothing gives away a bad paint-job like overspray on the inside of drawers, etc.


STEP 4
Prime with Kilz spray primer. Spray on 2 light coats and sand between each coat.  Think primer like the base coat of a manicure - I always notice that manicurists spend a great deal of time on this step because it really is the foundation for a good smooth finish.


STEP 5
Begin your paint! I used Valspar high gloss spray paint, and I like to use one of those handy spray-gun attachments you can get on the spray paint aisle at home depot. Saves your fingers from aching!! Spray on 2-3 light coats of color until you reach desired saturation.  As always, sand any drips or splotches between coats. This process is tedious, but it ensures you get that nice, even finish. 

*Helpful tip: don't let your dog anywhere near the project while it its still tacky. I learned this lesson the hard way and had to sand off a few black Greta hairs... ugh!


STEP 6 
Either spray on or brush on Minwax Polyacrylic in gloss finish.  I prefer to brush it on, as I feel like I get more control and more gloss with a brush. I think I did about 3 coats and waited the full drying time between each one! 

It rained for a few days while I was in between Polyacrylic coats, so I had to wait till it was dry enough outside to continue. This photo is after coat #1, and you can already see who shiny it looks!  (Hat for reflection purposes)

STEP 7
Allow plenty of drying time before you bring your piece inside! I left the dresser in our garage for a full 24 hours before bringing into the guest room.  I would also suggest waiting a couple days before placing anything on top of the piece... just so you get optimal drying!

STEP 8
Polish up the hardware.  This was arguably my most labor-intensive step.  I prefer to use Brasso polish on brass items along with an old toothbrush to get down into the crevices.  These handles had years and years of tarnish, and I actually had to let the Brasso sit on them for an hour or so before I got into the scrubbing.  After I scrubbed off all the tarnish, I used a soft microfiber towel to polish the brass.


Sheesh - lots of work, but just look at that reward!  Does anyone suggest a miracle solution that I can just dip tarnished brass into and pull out a clean, sparkly piece without all of this elbow grease?


STEP 9
Add your hardware back onto the dry piece. 

STEP 10
Congratulate yourself on a paint job well-done, and treat yourself to a celebratory cocktail, chocolate bar, or manicure!


Voila - the finished product!

Handles looking SO much better!

I love this retro panel on the front. Even more so with it's fresh coat of ivory!


Feeling proud of myself for the glossiest of glossy finishes!


Check out that draws liner... so funky I just had to leave it! 

One more before-and-after for good measure! Ah, the power of paint!

Hope you all have a fabulous weekend!

Xx
Ivy


Thursday, April 7, 2016

Our Living Room


The living room in our house has undergone a pretty drastic transformation (see my before pics in this post) since the day we bought it.   We decided to start our renovation process before we moved into the house to make it as easy on us as possible - I was in an apartment, and Mark was renting at a friend's house.  One of my favorite parts about the renovation process was visiting the house every evening to check out the day's progress - there is nothing in this world I find more satisfying than making positive changes to a home. Once it was all ready (save for a few touch ups) we moved in!

The whole process was bit of a whirlwind, and I'm so thankful I had been stockpiling ideas on Pinterest for a long time to help me make sense of what I wanted to accomplish in the house.  To bring this house into the 21st century, our aim was to lighten it up as much as possible while keeping some of the charm and character that comes with an older home - I had to keep reminding myself that the house was built in 1963, not yesterday.

The whole renovation process can be a bit intimidating for first-timers, especially for those who aren't dealing with this sort of thing at their day job.  We first walked the house with our contractor, Bryan, and came up with a reasonable punch list.  He had some great suggestions, and as we got more and more excited, we kept adding more and more updates to the list.  Once we had a bid from him, Mark and I looked it all over and decided on a budget and timeline.  Since a renovation can have a bit of a snowball effect, it is important to leave some buffer room in your budget for those incidentals and little things you will inevitably add on throughout the project - I'd recommend about 20%.

In case you missed the before tour...


Our punch list:
  • Replace original parquet floor with plank hardwood
  • remove the wall between the kitchen and living room (it had an awkward cupboard that the old owners were using to store firewood) to open up the space
  • replace funky 60s mantle with new mantle
  • paint brick white (Decorator's White, of course)
  • paint existing bookshelves high-gloss black
  • add crown moulding
  • paint all walls eggshell Decorator's White
  • paint all trim high-gloss white - I love to accent the trim this way... the reflection of light draws your attention to the trim in a subtle way.
  • install new can lighting and remove ceiling fan.
  • Install surround sound speaker system for better Nascar viewing (Mark) and Real Housewives marathons (me)... Sidenote: this was one of those "incidentals" I mentioned earlier. The guys teamed up and presented me with the fact that since we were already punching holes in the ceiling and patching and painting in order to install the can lighting, we might as well add some nice speakers while we were at it. I'm a sucker for a pleading man I guess... 
  • Install a fabulous flush-mount light we picked up in High Point
  • Remove shutters
  • Replace windowsills with white marble
  • Paint back door and interior doors black 


A few mid-renovation pics so you can get the full effect:

Bye Bye floors and wall!

We had to add a header in between the kitchen and living room for support. 

I wanted a gray/brown stain and Bryan gave us a few options to choose from.  We went with the far right!

These got freshened up with glossy black paint and new hardware. Thankfully, the shelves were already adjustable!

New floors going in!

Also removed this brass fireplace front

Looking into the kitchen - post on this coming soon!

Can lighting in, my men checking things out!  You can also see where we patchd over some existing cans that were placed in an odd configuration.  If you're going add recessed lighting, I always say try not to make your beautiful ceiling look like Swiss cheese.  

Crown moulding is up!

Enter the Black Paint! I'm not entirely sure what those little white panels are...


More prep work

First coat of white on the fireplace... looking better already!

Move-in day, new mantle awaiting a coat of glossy black paint. We were also waiting on more furniture to arrive from the upholsterer - we definitely ate our first pizza dinner in the new living room on the floor, but we were so thrilled to be in the house, that we didn't care!

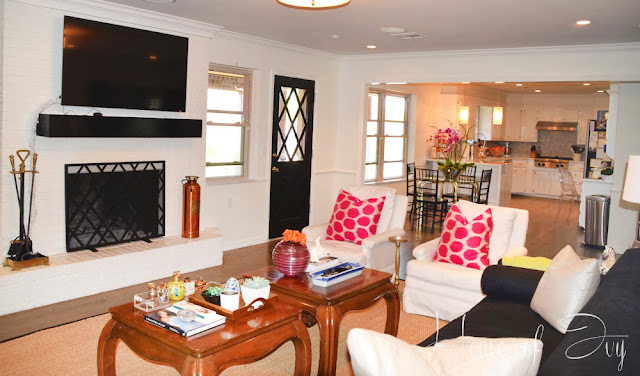
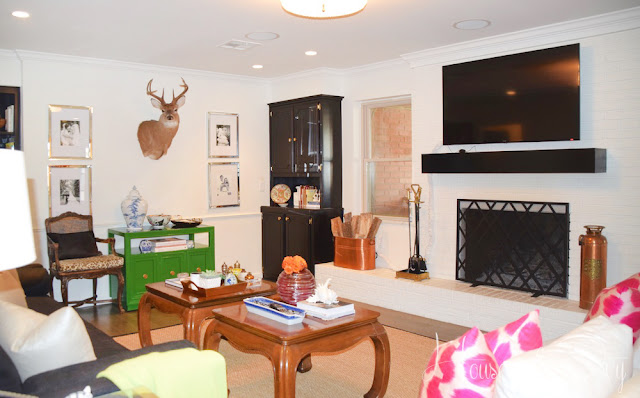
Sadly, I don't have any great pics of the room before we started moving furniture in... I wasn't even thinking about starting a blog at that time! Note to self: be more diligent photographer in the future. And finally, here are some shots of what the room looks like right now:


This space felt so tight and dark before - Crazy what the power of paint can do!

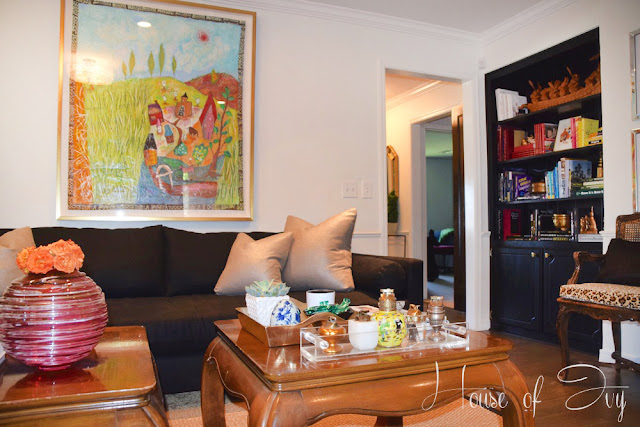
 Our much-beloved Verellen sofa, where we spend 98% of our free time. I have always wanted a black sofa, and I finally got one. People are often afraid of black (my husband included), but I like to think of black as a classic, clean neutral - just like your little black dress that goes with almost everything in your closet, your little black sofa will stand the test of time and the inevitable pillow-swap-out that comes with the seasonal redecorating itch.    


Post on the kitchen coming soon, but for now, you can see how opening up that wall allowed us to combine the two smaller spaces into one large entertaining area.


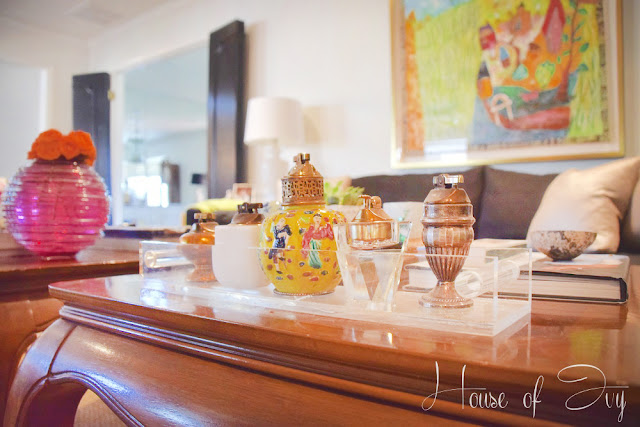
 My collection of vintage lighters - the yellow chinoiserie in the center is a memento from my time  spent interning under Charles Faudree, and I picked up the white onyx on my first trip to High Point Market with 30A Home. Memories are what make collections so special!

My love for blue and white porcelain will never die!

A pair of Staffordshire dogs that were a gift from my mother. 


And Finally, one more before-and-after for good measure! 
 
Before

After!

Projects leftover:
  • Roman shades - you know what they say, the cobbler's kids have no shoes... I have not gotten around to getting my own window treatments made, even though we've lived here for over a year!
  • Somehow hide the mass of TV cords (my cord cover isn't quite doing the trick)
  • Add a fun trim or passementerie frogs to skirt of white club chairs
  • Fun character rug or hide under the cocktail tables
  • Replace wedding photos in mirrored frames with scenic photos from honeymoon (These were deemed "too much of a shrine to us" by my other half)


Thanks for following me on this crazy house makeover journey! It's been quite a treat to share with all of you!

Xx
Ivy


SOURCES:
  • Seagrass rug: remnant from local carpet supplier - this is one of my favorite ways to save a buck on bound rugs. Ask to see the remnant selection at any carpet showroom, and you will be amazed at what you can find!  Note: I don't recommend seagrass for homeowners worried about spills. We had an unfortunate red-wine incident that left a permanent stain this rug, and I've been informed that the natural grass fibers are very very difficult to clean.  You win some, you lose some! 
  • Sofa: Verellen's Mathilda 98" in black chintz linen.  I can't sing Verellen's praises enough - 30A Home has been a proud Verellen vendor for many years, and I am so so passionate about this amazing line... I feel another post coming! We were so fortunate to receive this sofa as a wedding gift, and we absolutely adore it.  
  • Metallic linen pillows: Verellen
  • Green Chest: Craigslist find, lacquered green + new hardware. Has been with me since my single girl days.
  • Mirrored frames: West Elm
  • Mount: courtesy of my outdoorsy man
  • Fauteuil: I purchased this chair from the estate of local boutique owner, Ruth Meyers, and had it upholstered in Charles Faudree's "Trophy" velvet.  
  • Tray on green chest: Michael Aram. I use this tray to corral holiday cards, birth announcements and outdated invitations. Call me sentimental, but I hate throwing that kind of thing away!
  • Blue and white ginger jar on green chest: Juliska (another cherished wedding gift)
  • Chinoiserie bowl on green chest: OKC consignment shop. I love finding anything with the tobacco leaf pattern on our china.  Holds my collection of vintage matchbooks found at an estate sale! 
  • Artwork over sofa: "Landscape 1004-12" by Oklahoma artist Michi Susan.  A gift from Mark's parents on our first "official" Christmas.   To me, this piece represents my grandparents' farm where I spent much of my childhood, and where we were engaged in 2014. Her work can be seen at JRB Art at the Elms in the Paseo Arts District of OKC. 
  • Gold Side Table: 30A Home
  • Antique Milk Glass Lamp: 30A Home
  • White Club Chairs: These actually were sourced from the depths of Mark's family storage unit.  I had them reupholstered in a Tempotest outdoor fabric, which has saved them from many a red wine disaster!  I simply pop the cushion covers in the washer and air-dry.  Using an outdoor fabric was the only possible way white fabric would work in our household, and I have repeatedly recommended this solution to customers with children and pets. It always helps to have a little personal experience, right? 
  • Pink Ikat Pillows: 30A Home - made from a vintage african textile, but Madeline Weinrib has some pillows that look identical! 
  • Orange & Green Throws: West Elm and Steinmart (no longer available, but similar here)
  • Brass Martini Table: Vintage, found at an antique shop in OKC. I'm pretty sure it's original use was as an ashtray, but now it holds cocktail glasses.
  • Ming Cocktail Tables: probably my favorite craigslist find ever! (who am I kidding, I say that every time) They are not in the best of shape, but I feel like they have major character. 
  • Gold Tray: Target, old.
  • Blue and white remote control tray: Estate sale find.
  • Pink vase: Bebe's OKC.
  • Flush mount light: Vintage 70s piece found at High Point Market on a buying trip.